Rust quasicrystals
This is part 2 of this article, where I go over the multithreaded Rust implementation. Part 1 goes more in depth on the math, so if you want to understand this program on a more abstract level that’s where to look.
The Rust version has more features than the Clojure version. You can adjust the zoom level as well offset the viewport. You can also adjust the angles of each layer independently, or make the angles of the layers change over the course of the animation, and you can adjust the speed of the animation. It’s also more documented and has a better architecture, so it should be easier to extend. We’ll go over it file by file, but I won’t look at every single function, just the interesting ones.
Here’s an animation generated with 7 layers that have angles that change over the course of the animation. I don’t think it’s technically a quasicrystal (maybe for a few frames), but it is pretty neat:
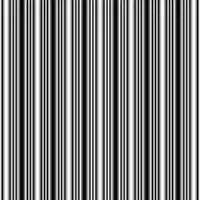
Command to generate these frames: quasicrystals 200 200 0:100,0:86:100,0:72:100,0:58:100,0:44:100,0:30:100,0:16:100 20 -p -f 120 -t 4 -s 0 -c greyscale 127
opts.rs
This is where the input options are defined. I used clap to define the command line arguments, but the opts struct is generic and could be used by other Rust code if you wanted to use this as a library instead of a command line program. This would require some minor modification in main.rs though.
parse.rs
This is where the input is parsed into data structures for the generation functions to use. Except for the angles and colorizer, everything can just be parsed with built in Rust parsers as you can see in parse_image:
pub fn parse_image(opts: &Opts, frame: u32) -> Image {
    return Image {
        phases: opts.speed,
        frame: frame,
        frames: opts.frames,
        scale: opts.scale,
        width: opts.width,
        height: opts.height,
        x_offset: opts.x_offset,
        y_offset: opts.y_offset,
        angles: parse_angles(&opts.angles, frame, opts.frames, opts.percent),
    };
}
This struct defines all the information we’ll need to get the 2d arrays of 0-1 values that represent shades. Converting them into pixels requires a colorizer. The function that does this is parse_colorizer which basically translates some strings into a more formal struct, I won’t go over it here.
Parsing the angles is more complex, as there are several ways to specify them. The most basic is a single number, which gets converted to a list of that many equal proportions, which is then converted to a list of angle rotations. You can also pass the proportions directly as a comma separated list of either fractions, percentages, or numbers. On top of that, all of these values can be changed over the course of the animation by passing multiple numbers separated by “:”.
A list of proportions is a description of how big the angles are in relation to each other. So 1,1,2 means 2 equal angles, then 1 angle that is twice as big as each of the first 2 (or as big as both of them combined). If you pass the -p (or –percent) argument, you can specify the angles as fractions or percentages, so instead of 1,1,2 you could say 25,25,50, or 1/4,1/4,1/2. This allows you to pass a list of angles that don’t add up to a full circle, like 10,10,10.
Parsing a list of percents is easy, we divide by 100 then multiply them by the unit circle (\(2\pi\) or \(\tau\)) to get the angle in radians.
To handle a list of proportions we use proportions_to_angles
fn proportions_to_angles(props: Vec<f64>) -> Vec<f64> {
    let circle_sects = TAU / props.iter().sum::<f64>();
    let mut sums = vec![props[0]];
    for p in &props[1..] {
        let sum_to_p = *p + sums.last().unwrap();
        sums.push(sum_to_p);
    }
    return sums.iter().map(|s| s * circle_sects).collect();
}
This takes a list of proportion values and converts them to angles of rotation for each layer. For example if our proportions are 1,2,1, the first layer is rotated 90 degrees, the next 180 degrees from the first, and the last 90 degrees from the second. First we find a common factor angle that can add up to each of these rotations. In this example it’d be 90. Then we make a list of how many of those angles we need to add up to the rotation for each layer. To do this we just add all the preceding values to each proportion in the list. So 1,2,1 becomes 1,3,4. Then we just multiply those values by the common factor angle to find the total rotation for each layer.
To parse an angle we check if it’s an animation then either parse the animation or parse the string into a number, handling fractions if needed. This is done in parse_angle. An animated angle is defined by “:” separated numbers which are basically keyframes to transition between. For example 1:10 means transition the number from 1 to 10 over the animation, so at half way “1:10” becomes “5”. Here’s the code to handle that:
fn parse_animation(anim_str: &str, frame: u32, frames: u32) -> f64 {
    let stages: Vec<f64> = anim_str.split(':').map(parse_maybe_frac).collect();
// 1
    let trans_frames: f64 = frames as f64 / (stages.len() as f64 - 1.0);
// 2
    let from_stage = stages
        .get((frame as f64 / trans_frames).floor() as usize)
        .unwrap();
// 3
    let to_stage = stages
        .get((frame as f64 / trans_frames).ceil() as usize)
        .unwrap();
// 4
    let trans_prog = (frame as f64 % trans_frames) / trans_frames;
// 5
    return (trans_prog * (to_stage - from_stage)) + from_stage;
}
- Divide the number of frames by the number of animation stages to get the frames per stage
- Take current frame number and divide it by the frames per stage rounded down to get the stage we’re transitioning from. Then grab the number for that stage
- Then do the same but round up to get the number we’re transitioning to
- Take current frame % frames per stage to get how far into the stage we are, and divide it by frames per stage to get a percent. For example, if we’re on frame 10 and the stages are 3 frames each, we’re 1 frame into a stage, or 1/3 of the way through.
- The difference between the number we’re coming from and going to is how much the number changes over this stage, so multiply that by how far we are through the stage. Then we have to add the number we’re coming from to get the number for this frame
crystal.rs
This file is basically where we implement the actual waveform generation. I won’t go over this it’s just a Rust version of the Clojure code with the addition of an offset factor for each coordinate.
color.rs
These are the functions to convert the 0-1 shade values into colored pixel values. For greyscale we take a brightness factor from 0 (all black) to 255 (all white) and plug it into this formula: \(2*brightness - 255 + shade\) then convert it to an 8-bit number. This conversion will round the shade up or down and give us a greyscale image.
For the sawtooth colors we just generate a sawtooth wave going from 0 to 255 over the course of the animation. Then for each color we select a point offset by some value, which is the percent through the wave that color will start. So if the offset is 0, we select 0 from the wave for the first frame, 127 for the halfway frame, and 255 for the last. If it’s 0.5 we select 127 for the first frame, 255 for the midpoint, and 126 for the last.
For composite colors we take a range of shade values and a range of 8-bit color values for each color channel. Then we just convert from the shade range to the 8-bit range to get the pixel color. The ranges can overlap but they don’t have to. This is an implementation of the 3 color composite mapping mentioned here. The composite colors can be animated just like the angles, both the input and output ranges can be animated. For example, here’s 7 even layers with a composite animation but no phase or angle animation:
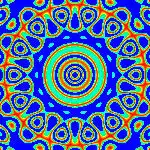
To generate the frames of this animation: quasicrystals 150 150 7 20 -p -f 48 -t 4 -s 0 -c composite 0:.3:.6:.3:0-.3:.6:1:.6:.3,.3:0:.3:.6:.3-.6:.3:.6:1:.6,.6:.3:0:.3:.6-1:.6:.3:.6:1
output.rs
This is where the file writing happens. Currently there are two ways to output files, as a gif or as a series of frame images. Both of these are very simple, they just take a vector of image data structures and write them to the disk using the Rust Image library. Gif writing is supported by that library so we just pass the images along and it handles the rest. Frame writing is just a for loop that writes each image with the same library.
main.rs
This is where everything gets tied together and multithreaded. By default it uses one thread, but you can specify more with the -t/--threads options. The main function is pretty long we’ll look at it in parts.
First we parse the input options, check if we have a valid output file, and decide how many threads to use. This is where the parse.rs functions are called.
fn main() {
    let opts: input::Opts = input::Opts::parse();
    let frames = opts.frames;
    let num_threads = if frames < opts.threads {
        frames
    } else {
        opts.threads
    };
    let (sender, receiver) = channel();
    let mut opt_frames: Vec<Option<RgbaImage>> = vec![None; frames as usize];
    if opts.image_format == "gif" {
        if opts.output == "./" {
            println!("Must set output flag when writing gifs");
            return;
        }
        if Path::new(&opts.output).exists() {
            println!("File {} exists, exiting", opts.output);
            return;
        }
    }
    println!(
        "Generating {} frames at {}x{} with angles {} and scale {} using {} threads",
        frames, opts.width, opts.height, opts.angles, opts.scale, num_threads
    );
Then we spawn the thread(s) that generate the shade values for each frame:
    if frames == 1 || num_threads == 1 {
        let frame_thread = gen_frames_thread(
            frames,
            num_threads,
            0,
            sender.clone(),
            opts.verbose
        );
        frame_thread.join().unwrap();
    } else {
        let mut threads: Vec<thread::JoinHandle<_>> = Vec::new();
        for thread_num in 0..num_threads {
            threads.push(gen_frames_thread(
                    frames,
                    num_threads,
                    thread_num,
                    sender.clone(),
                    opts.verbose
            ));
        }
        for thread in threads {
            thread.join().unwrap();
        }
    }
We use channels to pass the frames back to the main thread, this is where they’re received. We have to receive them inside a struct that also has which frame it is, because they aren’t necessarily going to be sent back to the main thread in the correct order. To order them we have a vec with length equal to the number of frames, pre-initialized with None. When a frame is received, we take the frame data and put it into the correct spot of the vec wrapped in a Some.
    while let Ok(result) = receiver.try_recv() {
        opt_frames[result.number as usize] = Some(result.frame);
    }
Finally we can pass the vec of Some(frame)s on to the image writing functions where they’ll be unwrapped and written to the output location:
    if opts.image_format == "gif" || opts.output.ends_with(".gif") {
        output::write_gif(opts.output, opt_frames, opts.allow_overwrite);
    } else {
       output::write_frames(
           opts.image_format,
           opt_frames,
           opts.output.clone(),
           opts.verbose,
           opts.allow_overwrite
        );
    }
}
The threads are spawned with the gen_frames_thread function. I’ll just summarize it since it’s pretty simple. It just calculates how many frames the thread should generate using the current thread number and the total number of frames. The last thread rounds up if needed, to account for the number of frames not splitting evenly into the number of threads. Then it’s just a for loop to call the gen function from crystal.rs for each frame. As each frame is generated, it’s put into a struct along with the frame number and sent back to main.rs for final processing. This function is also where the colorizer is parsed from the command line.
And that’s it! I glossed over a bunch to save space, but this should give you a pretty good idea of how this code is structured and what it does. In the next part of this series I won’t go over any code, instead I’ll look at a bunch of animations like this to get a more intuitive idea of where these patterns come from.

quasicrystals 150 150 0:100,0:86:100,0:72:100,0:58:100,0:44:100,0:30:100,0:16:100 20 -p -f 120 -t 4 -s 0 -c composite 0:.3:.6:.3:0-.3:.6:1:.6:.3,.3:0:.3:.6:.3-.6:.3:.6:1:.6,.6:.3:0:.3:.6-1:.6:.3:.6:1